Looking to build a deadlift platform without breaking the bank? You’re in the right place. With a little elbow grease and some basic materials, you can create a sturdy, professional-grade platform for less than $100. Whether you’re a home gym enthusiast or just tired of wrecking your floors, this DIY project is a game-changer. Let’s dive into the nitty-gritty of building your own deadlift platform that’s both durable and budget-friendly.
First off, let’s talk about why you’d want to build your own platform instead of buying one. Store-bought platforms can cost hundreds of dollars, and let’s be real—most of us aren’t trying to drop that kind of cash on a piece of gym equipment. Plus, building your own allows you to customize it to fit your space and style. It’s also a fun project that’ll make you feel like a total DIY boss when you’re done. And hey, you’ll save money while protecting your floors from those heavy deadlifts. Win-win.
Here’s the good news: you don’t need a ton of fancy materials to get started. Most of what you’ll need can be found at your local hardware store. Here’s the shopping list:
All of this should cost you less than $100, especially if you shop around for deals or use coupons. Pro tip: check out local farm supply stores for rubber mats—they’re often cheaper there than at big-box retailers.
Now that you’ve got your materials, it’s time to get to work. Don’t worry—this isn’t rocket science. Follow these steps, and you’ll have a solid platform in no time.
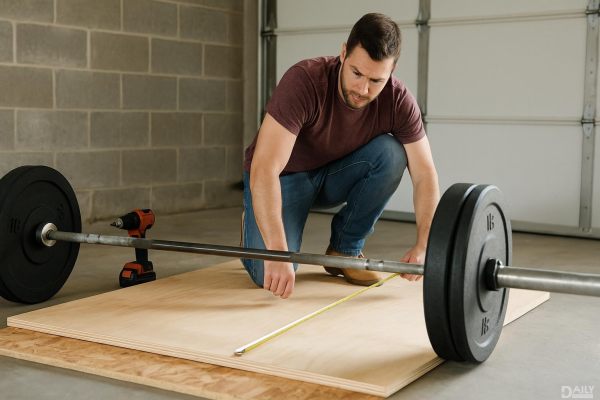
Start by cutting one of the plywood sheets in half lengthwise. You’ll end up with two 2x8-foot pieces. These will form the base of your platform. The other full sheet of plywood will go on top, so leave that intact for now.
Lay the two 2x8-foot plywood pieces side by side to form a 4x8-foot base. Use wood screws to secure them together along the seam. Make sure the edges are flush so your platform is level. This base layer will provide the stability you need for heavy lifts.
Place the full 4x8-foot sheet of plywood on top of the base. Secure it with wood screws, spacing them about 6 inches apart along the edges. This top layer will give your platform extra durability and a smooth surface.
Cut the MDF or particle board into two 2x4-foot pieces. These will go on either side of the platform to create a center strip for your feet and the barbell. Use wood glue to attach them to the top layer, then secure them with screws. Sand the edges to make sure everything is smooth and safe to use.
Cut the rubber horse stall mats to fit the sides of the platform. You’ll want two 2x4-foot pieces to cover the areas where the weights will land. Secure the mats with screws or adhesive, making sure they’re firmly attached. The rubber will protect your platform and reduce noise when you drop the barbell.
Sand any rough edges and give the entire platform a once-over to make sure everything is secure. If you’re feeling fancy, you can stain or seal the wood for a polished look. But honestly, it’s a deadlift platform—it’s gonna get beat up anyway.
Once your platform is built, you’ll want to keep it in good shape. Here are a few tips to make it last:
Not only is this DIY deadlift platform affordable, but it’s also incredibly sturdy. The combination of plywood and rubber mats creates a surface that can handle heavy weights without damaging your floors. Plus, it’s customizable—you can adjust the size or add personal touches like logos or designs. And let’s not forget the bragging rights. When your gym buddies see your homemade platform, they’ll be begging you to build one for them too.
So there you have it—a step-by-step guide to building a deadlift platform for less than $100. It’s a simple, cost-effective solution that’ll take your home gym to the next level. Now grab your tools, get to work, and start lifting heavy without worrying about your floors. You’ve got this!