If your belt is suddenly feeling a little too snug, don’t panic—you don’t need to rush out and buy a new one. Adding an extra hole to your belt is a quick and easy DIY fix that anyone can do at home with just a few basic tools. Whether your belt has shrunk (unlikely), you’ve indulged in one too many burgers (no judgment), or you just need a better fit, we’ve got you covered with simple, foolproof methods to get that belt sitting comfortably again.
Belts stretch, leather wears, and bodies change—it’s just life. Maybe you’ve been hitting the gym and your waistline has slimmed down, or perhaps that holiday weight hasn’t quite melted away yet. Either way, belts don’t always keep up with our ever-changing dimensions. And let’s be real: belts aren’t cheap, especially if you’ve invested in a quality leather one. Rather than tossing it aside or forcing yourself into an uncomfortable squeeze, adding a new hole is the smart, budget-friendly move.
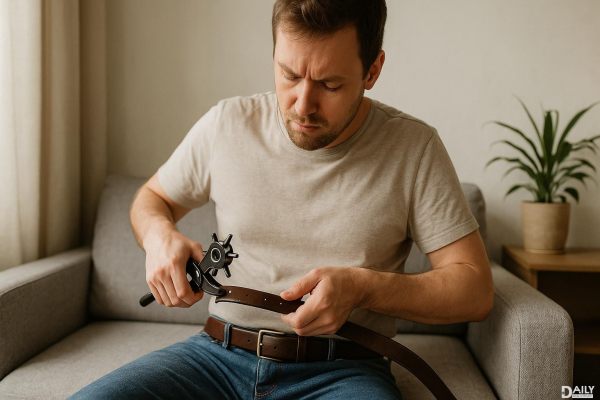
You don’t need a professional leather punch or a workshop full of tools to get this done. A sharp knife, a nail and hammer, or even a drill can do the trick. If you want to get a little fancier, a leather hole punch (which you can grab for under $10 at most craft stores) will give you the cleanest results. But if you’re in a pinch, household items work just fine—just be careful not to hack up your belt in the process.
This is the old-school way, and it works like a charm. Grab a nail that’s roughly the same size as your belt’s existing holes, position it where you want the new hole, and give it a few firm taps with a hammer. The key here is precision—make sure the nail is straight and steady so you don’t end up with a jagged, uneven hole. If your belt is thick or stiff, heating the nail slightly (with a lighter, for example) can help it glide through the leather more smoothly. Once the hole is punched, smooth out any rough edges with a bit of sandpaper or the edge of your knife.
If you’ve got a power drill handy, this method is fast and effective. Use a drill bit that matches the size of your belt’s current holes, and go slow—leather can tear if you rush it. Place a scrap piece of wood underneath the belt to protect your work surface and drill straight down. The result? A clean, professional-looking hole with minimal effort. Just be sure to wipe away any leather dust afterward so it doesn’t gunk up your buckle.
If you’re confident with a blade, a sharp utility knife or X-Acto knife can carve out a new hole with precision. Mark where you want the hole, then carefully twist the knife in a circular motion to cut through the leather. This method takes a steady hand, so if you’re prone to accidental slips, maybe stick to the nail or drill. Once the hole is cut, use the knife’s edge or sandpaper to refine the edges.
If you want your DIY hole to blend in seamlessly with the rest of your belt, a little finishing goes a long way. After punching the hole, rub a small amount of leather conditioner or even clear nail polish around the edges to prevent fraying and give it a polished look. If your belt has a lining or multiple layers, make sure you’ve punched through all of them cleanly—nothing worse than a half-formed hole that snags every time you try to buckle up.
Sometimes, belts are beyond saving. If yours is cracked, overly stretched, or has more DIY holes than original ones, it might be time to retire it. Adding too many extra holes can weaken the leather, and at some point, you’re just delaying the inevitable. But if your belt is still in good shape, a new hole can give it a second life—saving you money and keeping your favorite accessory in rotation.
So next time your belt feels a little too tight, don’t stress—just grab a nail, a drill, or a knife and make it work for you. A perfect fit is just one hole away.